Cheap External Ips to Your Home Network
January 24, 2025Intro
For my homelab Kubernetes cluster i had an interesting problem: i already have 443/tcp bound to my main ipv4 address from my provider. I use it already in my homelab as a reverse proxy to some other services already running on some other virtual machines. But i also run a Kubernetes cluster in my homelab that i mainly use for hosting experimental things. Also a lot of ingress stuff. So i wanted the host my own ingress on a external ip address. After some trial and error i found the perfect cheap solution: A Hetzner virtual machine with a floating ip and routing that IP through GRE to my OPNSense router.
Some preperations
First, i needed to set some things up. I created a virtual machine at Hetzner Cloud. Just a low spec virtual machine. After that machine was up and running i added a “Floating IP”. That is basically a ip address that you can assign to one or more virtual machines.
After the machine was created i logged in and turned on the arp_proxy and forwarding in /etc/sysctl.conf:
$ sudo cat /etc/sysctl.conf

net.ipv4.ip_forward=1
net.ipv4.conf.all.proxy_arp=1
After that, i run the following command for it to persist:
$ sudo sysctl -p
After that, Proxy ARP and IP Forwarding was activated and i could continue with the next step: setting up GRE.
Setting up GRE - Hetzner side
For GRE to work you can add a new tunnel interface file to /etc/network/interfaces.d directory. I created the file called gre-tunnel.cfg
$ sudo cat /etc/network/interfaces.d/gre-tunnel.cfg
auto tun0
iface tun0 inet static
  address 10.99.239.17
  netmask 255.255.255.252
  pre-up ip tunnel add tun0 mode gre remote 2.2.2.2 local 1.1.1.1 dev eth0
  up ip route add 123.123.123.123/32 dev tun0
  pre-down ip route del 123.123.123.123
  pre-down ip tunnel del tun0
Lets break this down bit by bit:
the address part
The address is part of your GRE point to point network. I use a CIDR block 10.99.239.16/30 here. This basically gives you 2 usable ip address. perfect for a point-to-point network. Thet netmask is calculated from /30 and will be 255.255.255.252
$ ipcalc 10.99.239.16/30
Address:   10.99.239.16         00001010.01100011.11101111.000100 00
Netmask:   255.255.255.252 = 30 11111111.11111111.11111111.111111 00
Wildcard:  0.0.0.3              00000000.00000000.00000000.000000 11
=>
Network:   10.99.239.16/30      00001010.01100011.11101111.000100 00
HostMin:   10.99.239.17         00001010.01100011.11101111.000100 01
HostMax:   10.99.239.18         00001010.01100011.11101111.000100 10
Broadcast: 10.99.239.19         00001010.01100011.11101111.000100 11
Hosts/Net: 2                     Class A, Private Internet
So i use the first ip address in that range as my point-to-point on the Hetzner side.
the pre-up part
In the pre-up part i specify that i want the tunnel to be created before the interface is being configured with this command:
ip tunnel add tun0 mode gre remote 2.2.2.2 local 1.1.1.1 dev eth0
the remote 2.2.2.2 part is the other side you want to connect, in this example this would be my home address. the local 1.1.1.1 part would be my local IP address from my Hetzner VM. This is the host IP itself, not the Floating IP Address.
the up part
In the up part i add a static route to my tunnel address.
up ip route add 123.123.123.123/32 dev tun0
The IP 123.123.123.123/32 is the floating IP address that i assigned to my virtual machine in the hetzner console. I basically add a static route so the ip address will be routed to that interface
the pre-down part
In the pre-down part i specify that i want to delete the route and remove the tunnel before the interface itself is taken down
Setting up GRE - OPNSense at home side
The OPNSense part was more tricky to fix. I had to fiddle out some specific settings. I will describe them the best i can.
GRE - Interface set-up - OPNSense
First, create your GRE interface. Go to: Interfaces --> Other Types --> GRE.
After that, create the GRE interface.
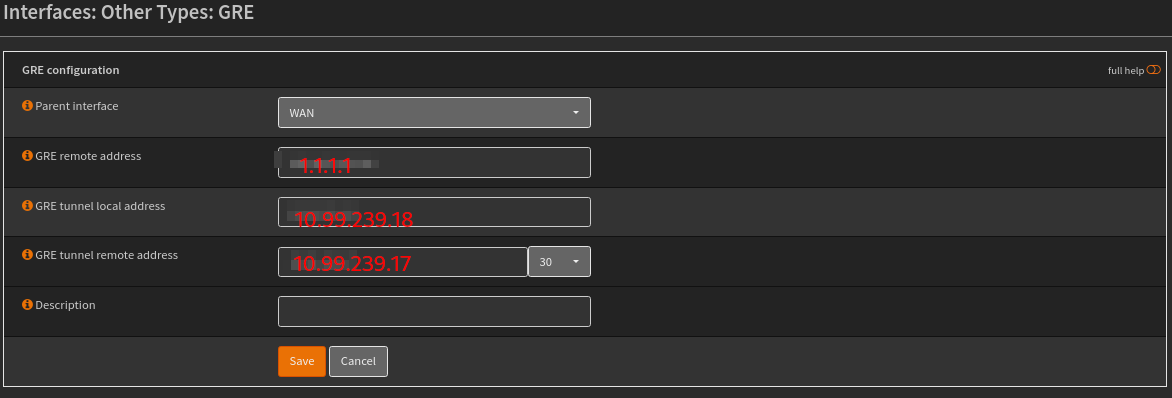
I have obfuscated the screenshot due to privacy concerns. But it basically speaks for itself:
- WAN Interface - Your external Interface
1.1.1.1- is the external IP Address of the Hetzner virtual machine10.99.239.18- The local point-to-point address of the OPNsense machine10.99.239.17/30- The remote point-to-point address of the Hetzner virtual machine
GRE - Assign interface and configuring it - OPNSense
Now it is time to assign the interface. Go to Interfaces --> Assignment and select your GRE interface. Give it a description and click on Add.
After that, enable your interface.
Go to Interfaces --> Your Interface name and click Enable Interface. Also make sure to click the checkboxes of the Block Private Networks and Block bogon networks. Click Save.
GRE - Enable the Default route - OPNSense
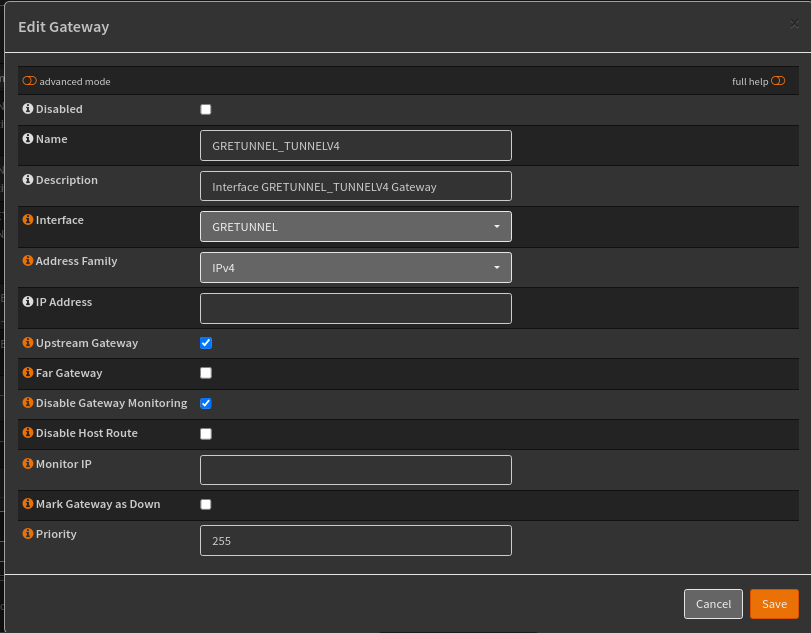
Now it is time to enable the default route. Go to System --> Gateways --> Configuration.
Find your Gateway, it is called something like GW_DESCRIPTIONOFYOURINTERFACE and click the little pencil.
Click on the checkbox called Upstream Gateway and click on save.
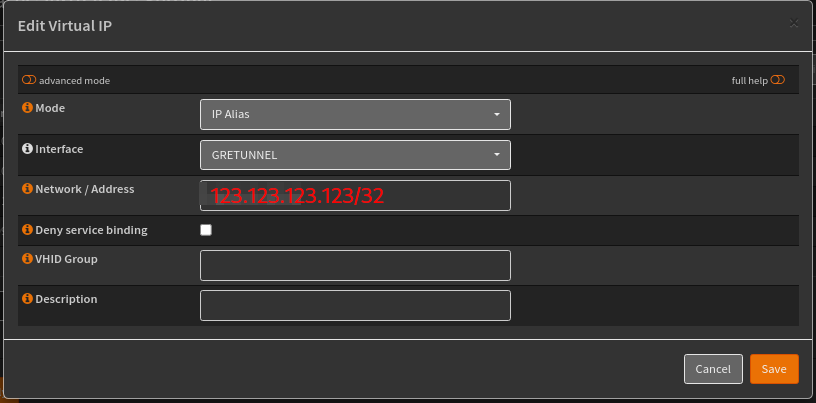
GRE - Add a Virtual IP - OPNSense
I added the ip adress from the Hetzner Floating IP 123.123.123.123 as Virtual IP.
This can be done by going to: Interfaces --> Virtual IP's --> Settings
Add your virtual IP Address there.
GRE - MTU Sizes - Optional
I had some problems with sites not reachable through the GRE tunnel. You maybe have to play somewhat with the MTU and MSS settings. You can do that by going to the Interface --> YOURGREINTERFACE and set:
MTU: 1476
MSS: 1440
This helped me overcome some connection problems.
GRE - Firewall rules - OPNSense
After that, let’s setup some firewall rules. You don’t want anybody to connect to your GRE tunnel.
Go to Firewall --> Rules --> YOURWANTINTERFACE. Create a firewall rule for the following:
INTERFACE: WAN
Direction: in
TCP/IP Version: IPv4
Protocol: GRE
Source: 1.1.1.1/32
That should be enough to keep the GRE protocol firewalled.
GRE - Configure Port Forwarding - OPNSense
Now it is time to configure some port forwarding. Go to Firewall --> NAT --> Port forward.
Add the following Port forward:
INTERFACE: GRETUNNEL
DESTINATION: 123.123.123.123
Redirect Target IP: <ipadressofyourwebserver>
Redirect port: 80 or 443
The firewall rule will be created automatically.
Now your web server should be reachable from the ip adddress 123.123.123.123
You can also optionally configure a Outbound NAT rule to route some traffic to this GRE tunnel.
GRE - Configure Outbound NAT and routing through GRE Tunnel
Outbound NAT
First, make sure to set your Outbound nat to Hybrid. After that, you can create a outbound nat rule
Go to Firewall --> NAT --> Outbound
Add the following rule:
INTERFACE: GRETUNNEL
Source Addres: <yoursubnetyouwanttoroutethroughthegretunnel>/24
Translation / Target: 123.123.123.123
Click on save and you have configured part one of the Outbound rule
Now you have to configure a firewall rule to match and route the traffic through the GRE tunnel itself. This can be done with a firewall rule. Go to Firewall --> Rules -->TheNetworkWhereYourHostsLive
And add the following rule:
INTERFACE: TheNetworkWhereYourHostsLive
Source: <yoursubnetyouwanttoroutethroughthegretunnel>/24 or a host/32
Gateway: Your GRE Gateway
Click save and click Apply. Now your hosts will route all traffic through the GRE Tunnel.
Optional: Add firewall rules to your Linux host for routing the GRE traffic
I added some optional firewall rules because i like to enable firewalld.
# adding my tun0 and eth0 to the same zone. This makes it possible to add firewall rules to those interfaces:
$ firewall-cmd --zone=public --add-interface=eth0 --add-interface=tun0 --permanent

# Adding a allow all rule to firewalld for all my other ip addresses
$ firewall-cmd --permanent --zone=public --add-source=<ip1> --add-source=<ip2>

# Add a firewall rule to allow GRE traffic from your endpoint to the Linux machine
$ firewall-cmd --add-rich-rule='rule family=ipv4 source address=<ip home> service name=gre log prefix="GRE" level="notice" accept'

# And the last one is to allow all traffic to your routes ip address:
firewall-cmd --zone=public --add-rich-rule='rule family="ipv4" destination address="<second ip of hetzner>" accept' --permanent
Conclusion
This is a very cheap way to have some extra IPv4 addresses at your disposal when having a advanced home router such as OPNSense. A Virtual machine from Hetzner starts with 3,49 euro and a floating IP Address costs around 3 euro. A very cheap way to get some extra ip addresses for your homelab.
